


From Cybersecurity to AI: How I Built ML based HeartApp Using AI-Assisted Coding
- This is a long overdue post; I was planning to write it for a while as I built this App in January 2025 as part of my research and experimentation with different ML models, but due to time constraints finally wrote it. I will begin with setting context first and then proceed with my technical learnings. Coming from a cybersecurity background, I’ve always been fascinated by how data scientists and machine learning (ML) experts build their models. It seemed like a complex and highly technical process, one that felt a bit out of reach. However, my curiosity led me to pursue a doctorate in AI/ML, and along the way, I became captivated by the capabilities of generative AI.
- How AI Assisted in Developing HeartApp
- Approach
- Creating the Initial Prompt
- Fixing and Optimizing the Code
- Build the ML Model to Predict Heart Disease -High Level concept & Code Walk Through Steps.
- Step 1: Importing Necessary Libraries
- Step 2: Data Acquisition
- Step 3: Data Preparation
- 1. Handle Missing Values
- 2. Encode Categorical Features
- 3. Separate features and target variables
- 4. Feature Scaling
- 5. Splitting the Data
- Step 4: Model Building
- 1. Logistic Regression
- 2. Decision Tree
- 3. Random Forest
- Step 5: Model Evaluation
- Step 6: Insights and Conclusions
- Step 7: Saving the Best Model
- Deploying HeartApp with Flask
- 1. Import Required Libraries
- 2. Initialize Flask App and Load the Model
- 3. Create a Prediction Endpoint
- 4. Running the Flask Application
- How It Works
- Testing the API
- HeartApp Demo
- Key Takeaways
- Conclusion
Contents
- This is a long overdue post; I was planning to write it for a while as I built this App in January 2025 as part of my research and experimentation with different ML models, but due to time constraints finally wrote it. I will begin with setting context first and then proceed with my technical learnings. Coming from a cybersecurity background, I’ve always been fascinated by how data scientists and machine learning (ML) experts build their models. It seemed like a complex and highly technical process, one that felt a bit out of reach. However, my curiosity led me to pursue a doctorate in AI/ML, and along the way, I became captivated by the capabilities of generative AI.
- How AI Assisted in Developing HeartApp
- Approach
- Creating the Initial Prompt
- Fixing and Optimizing the Code
- Build the ML Model to Predict Heart Disease -High Level concept & Code Walk Through Steps.
- Step 1: Importing Necessary Libraries
- Step 2: Data Acquisition
- Step 3: Data Preparation
- 1. Handle Missing Values
- 2. Encode Categorical Features
- 3. Separate features and target variables
- 4. Feature Scaling
- 5. Splitting the Data
- Step 4: Model Building
- 1. Logistic Regression
- 2. Decision Tree
- 3. Random Forest
- Step 5: Model Evaluation
- Step 6: Insights and Conclusions
- Step 7: Saving the Best Model
- Deploying HeartApp with Flask
- 1. Import Required Libraries
- 2. Initialize Flask App and Load the Model
- 3. Create a Prediction Endpoint
- 4. Running the Flask Application
- How It Works
- Testing the API
- HeartApp Demo
- Key Takeaways
- Conclusion
This is a long overdue post; I was planning to write it for a while as I built this App in January 2025 as part of my research and experimentation with different ML models, but due to time constraints finally wrote it. I will begin with setting context first and then proceed with my technical learnings. Coming from a cybersecurity background, I’ve always been fascinated by how data scientists and machine learning (ML) experts build their models. It seemed like a complex and highly technical process, one that felt a bit out of reach. However, my curiosity led me to pursue a doctorate in AI/ML, and along the way, I became captivated by the capabilities of generative AI.
What surprised me the most? How AI itself could simplify and accelerate the process of building ML models. By leveraging AI-assisted coding, I discovered that creating effective machine lea
ing applications isn’t as complicated as it once seemed,it serves as an augmentation tool that enhances developer efficiency and creativity. As AI leaders often say, “The future of artificial intelligence is not about man versus machine, but rather man with machine.” Now, after building several models using AI’s code generation capabilities, I’m excited to share how straightforward the process can be.
In this blog post, I’ll Walk you through an example of how I built HeartApp — an AI-powered application [in proof-of-concept stage] designed to predict heart disease.
How AI Assisted in Developing HeartApp
The idea behind HeartApp was simple: create an application that could analyze user data and predict the likelihood of heart disease. While the goal was ambitious, AI-assisted coding made the process much smoother. I also like to pay my gratitude to my university professors who helped me in introducing to amazing portal’s/resource hubs like Kaggle, scikit-lea
, huggingface etc which are really useful in this process. without any further ado, let me start with how AI helped me:
- Code Generation: Using AI-powered code generators, I was able to generate much of the core logic needed to build the ML model. For code generation, I primarily used github co-pilot available in Vscode.
- Debugging and Optimization: Tools like GitHub Copilot provided suggestions to fix code issues and optimize performance.
- Automated Documentation: AI also assisted in creating clear explanations, helping me (and eventually others) understand different parts of code implementation, which helps in manual fixing as well.
The result? A functional, efficient heart disease prediction model built faster and more accurately than I could have imagined.
Approach
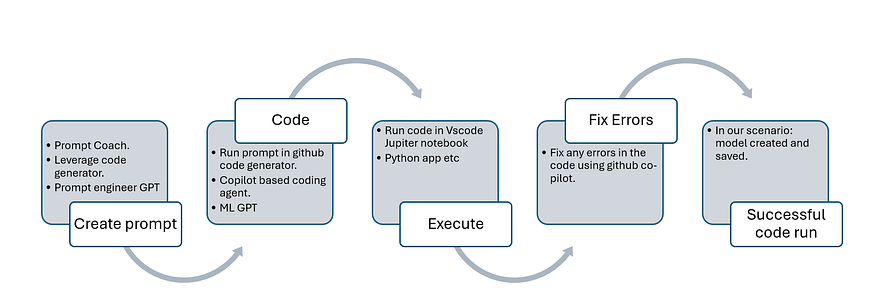
Creating the Initial Prompt
To kick things off, I used prompt engineering techniques. My initial prompt to the AI was straightforward, reflecting my implicit knowledge of the process:
- Use scikit-lea
for model development. - Source data from Kaggle for training and testing.
so, my human prompt to that prompt engineering GPT was as below:

As a human who is a scholar of GenAI/AI/ML. I created a simple prompt with implicit knowledge that to build this model I would use scikit-lea
and use data from kaggle to train, test and evaluate the model. With my high-level instructions, prompt engineering GPT created following prompt
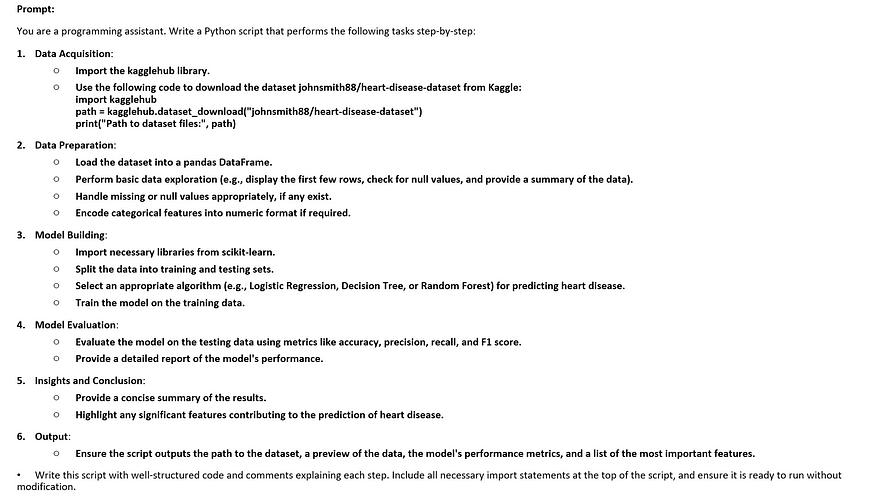
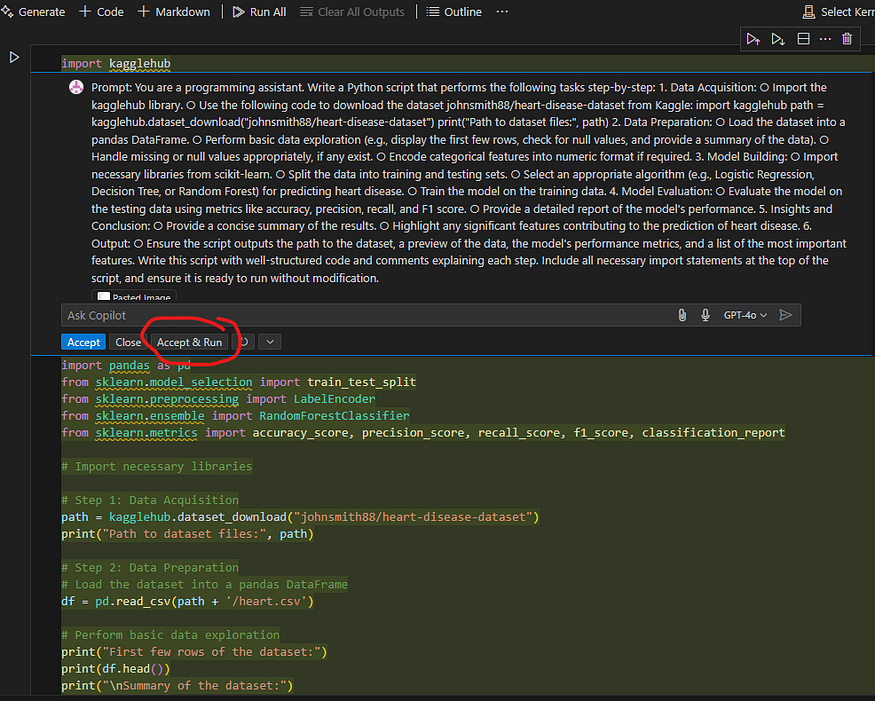
Which when I ran into my VsCode’s code generator inside its jupyter notebook, created the code which was almost ready to use.
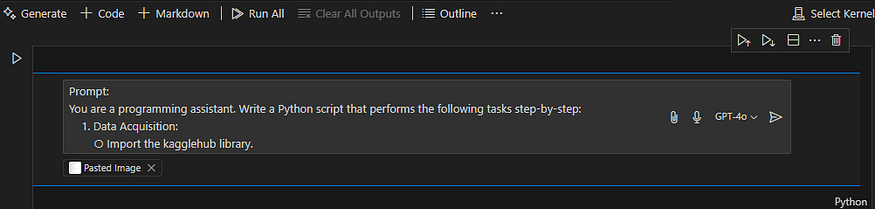
Generates the code as seen below, once you click Accept & Run and select the appropriate ke
el, it will execute the code.
Fixing and Optimizing the Code
No code is perfect on the first try, and that’s where AI-assisted tools like GitHub Copilot came into play. For instance:
- Data Adjustments: If there were mismatches in column names or missing libraries, AI provided quick fixes, I love github-copilot’s fix options, works most of the time.
- Error Troubleshooting: GitHub Copilot offered suggestions for error handling and optimization, making the debugging process much faster.
I purposefully selected a ke
el which did not have the libraries installed to demo an error related to that and how github pilot tells you what to do in that case.

After installing all required libraries or choosing virtual environment which has all the installed libraries, code will run smoothly.
Build the ML Model to Predict Heart Disease -High Level concept & Code Walk Through Steps.
The core of HeartApp involved building an ML model to predict heart disease. Here’s how I approached it:
Data Preparation:
- Imported necessary libraries like
pandas,scikit-lea, and
numpy. - Acquired data from Kaggle’s heart disease dataset.
- Preprocessed the data — handling missing values, encoding categorical features, and scaling numerical ones.
Model Training:
- Trained multiple models including Logistic Regression, Decision Trees, and Random Forests to identify which performed best.
Evaluation:
- Assessed each model based on accuracy, precision, recall, and F1-score.
- The Random Forest model emerged as the top performer.
Step 1: Importing Necessary Libraries
Before starting, we need to install and import the required libraries:
%pip install scikit-lea

%pip install kagglehub
import pandas as pd
import numpy as np
from sklea
.model_selection import train_test_split
from sklea
.preprocessing import LabelEncoder, StandardScaler
from sklea
.linear_model import LogisticRegression
from sklea
.tree import DecisionTreeClassifier
from sklea
.ensemble import RandomForestClassifier
from sklea
.metrics import accuracy_score, precision_score, recall_score, f1_score, classification_report
import kagglehub
import joblib
Step 2: Data Acquisition
To build our model, we need a dataset. Here, we download the heart disease dataset from Kaggle:
path = kagglehub.dataset_download("johnsmith88/heart-disease-dataset")
file_path = f"{path}/heart.csv"
data = pd.read_csv(file_path)
Step 3: Data Preparation
Before feeding the data into ML models, we need to clean and preprocess it:
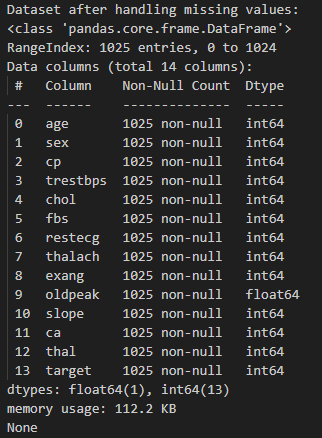
1. Handle Missing Values
We check for and handle missing values:
data = data.dropna()
Dataset visualized for after code execution, for missing values
2. Encode Categorical Features
Certain columns may be categorical and need encoding. Here, we assume ‘sex’ and ‘cp’ are categorical features:
categorical_columns = ['sex', 'cp']
encoder = LabelEncoder()
for col in categorical_columns:
    data[col] = encoder.fit_transform(data[col])
3. Separate features and target variables
X = data.drop(columns=['target'])  # Adjust 'target' to match the target column in your dataset
y = data['target']
4. Feature Scaling
Standardizing numerical features ensures that ML models perform optimally:
scaler = StandardScaler()
X = scaler.fit_transform(data.drop(columns=['target']))
y = data['target']
5. Splitting the Data
We divide the dataset into training and testing sets:
X_train, X_test, y_train, y_test = train_test_split(X, y, test_size=0.2, random_state=42)
Step 4: Model Building
We train three different models for comparison, since we are trying to predict if a user can have heart disease or not, we are using classification models for our purpose:
1. Logistic Regression
logistic_model = LogisticRegression(random_state=42)
logistic_model.fit(X_train, y_train)
2. Decision Tree
tree_model = DecisionTreeClassifier(random_state=42)
tree_model.fit(X_train, y_train)
3. Random Forest
forest_model = RandomForestClassifier(random_state=42)
forest_model.fit(X_train, y_train)
Step 5: Model Evaluation
We evaluate each model using accuracy, precision, recall, and F1 score:
def evaluate_model(model, X_test, y_test, model_name):
    y_pred = model.predict(X_test)
    accuracy = accuracy_score(y_test, y_pred)
    precision = precision_score(y_test, y_pred)
    recall = recall_score(y_test, y_pred)
    f1 = f1_score(y_test, y_pred)

    print(f"\nPerformance of {model_name}:")
    print(f"Accuracy: {accuracy:.2f}")
    print(f"Precision: {precision:.2f}")
    print(f"Recall: {recall:.2f}")
    print(f"F1 Score: {f1:.2f}")
    print("\nClassification Report:")
    print(classification_report(y_test, y_pred))

    retu
 f1
We determine the best model:
best_model = None
best_score = 0
best_model_name = ""
logistic_f1 = evaluate_model(logistic_model, X_test, y_test, "Logistic Regression")
if logistic_f1 > best_score:
    best_score = logistic_f1
    best_model = logistic_model
    best_model_name = "Logistic Regression"tree_f1 = evaluate_model(tree_model, X_test, y_test, "Decision Tree")
if tree_f1 > best_score:
    best_score = tree_f1
    best_model = tree_model
    best_model_name = "Decision Tree"forest_f1 = evaluate_model(forest_model, X_test, y_test, "Random Forest")
if forest_f1 > best_score:
    best_score = forest_f1
    best_model = forest_model
    best_model_name = "Random Forest"
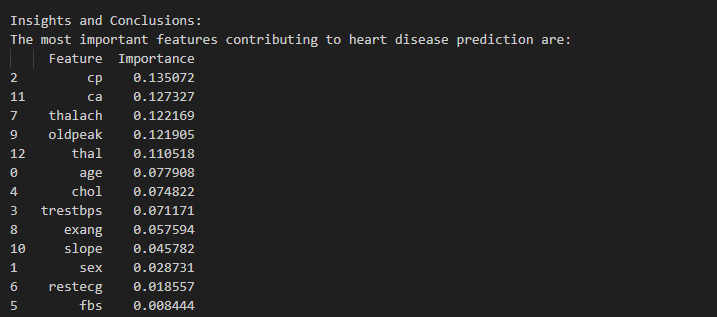
Step 6: Insights and Conclusions
We analyze the importance of features in the best-performing model:
feature_importances = pd.DataFrame({
    'Feature': data.drop(columns=['target']).columns,
    'Importance': forest_model.feature_importances_
}).sort_values(by='Importance', ascending=False)
print("\nKey features contributing to heart disease prediction:")
print(feature_importances.head())
From the execution of code, following feature list shows the most important ones that help in the prediction e.g. cp-chest pain,ca-number of major vessels (0–3) colored by flourosopy,Thalach-maximum heart rate achieved, you can read about different features on kaggle Heart Disease Dataset
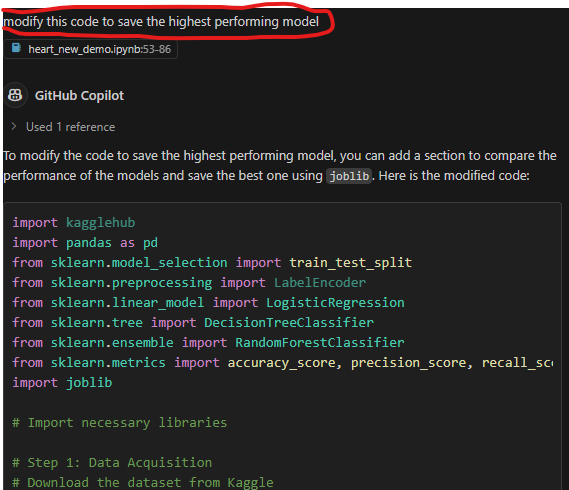
Step 7: Saving the Best Model
Finally, we save the best-performing model for future use, please refer to the performance metric, where we can see random forest accuracy as 0.99 and other 3 metrics almost close to 1 which is needed for best performing model , I modified the original code that was created initially to add this as I tried various combinations to check which one is the best model for my scenario, once I reached that point , I simple asked github co-pilot to add following lines with a simple prompt like “ modify the code to save the best model after evaluation.”:
model_filename = f"{best_model_name.replace(' ', '_').lower()}.pkl"
joblib.dump(best_model, model_filename)
print(f"\nBest model ({best_model_name}) saved as '{model_filename}'.")
Performance metric of Random Forest model.

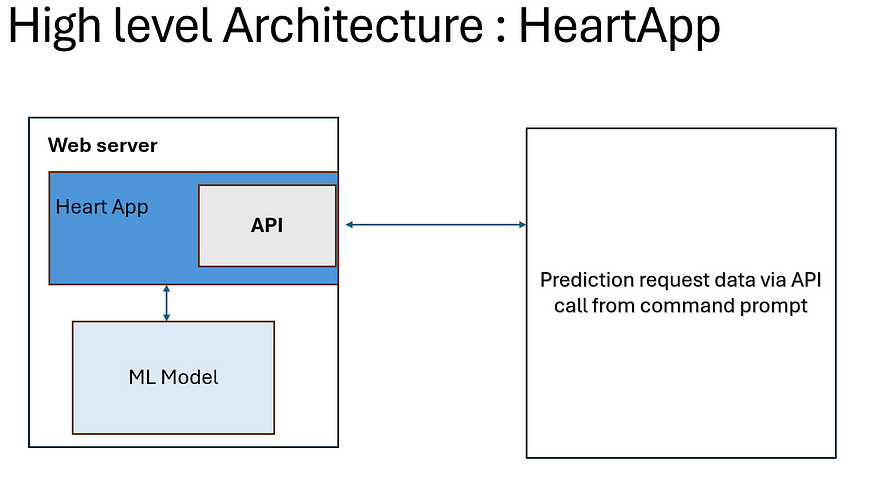
Deploying HeartApp with Flask
To make HeartApp accessible, I deployed it as a web service using Flask. This way, users could send data via API calls and receive real-time predictions.
- Flask Setup: Built a simple Flask application that loaded the trained model. For proof of concept purpose I setup my test machine as Flask application, its the same machine where I m running my Vscode.
- Prediction API: Created an endpoint that accepted JSON input and retu
ed predictions. - Testing: Theoretically you can use tools like Postman and Python scripts to test and validate predictions. But in my POC, I used command prompt in my vscode terminal to do that.
There can be many use cases developed based on the requirement which I will share later in my next update of this blog.
1. Import Required Libraries
from flask import Flask, request, jsonify
import joblib
import pandas as pd
2. Initialize Flask App and Load the Model
app = Flask(__name__)
# Load the trained model
model = joblib.load('random_forest_model.pkl')# Define feature names (same order as in training)
feature_names = ['age', 'sex', 'cp', 'trestbps', 'chol', 'fbs', 'restecg',
                 'thalach', 'exang', 'oldpeak', 'slope', 'ca', 'thal']
3. Create a Prediction Endpoint
We define an API endpoint that accepts a POST request with input data in JSON format. The model processes the input and retu
s a prediction.
@app.route('/predict', methods=['POST'])
def predict():
    try:
        # Get JSON request data
        data = request.get_json()
        # Convert JSON input to a DataFrame (ensures feature names are present)
        df_input = pd.DataFrame([data], columns=feature_names)        # Make prediction
        prediction = model.predict(df_input)[0]

        retu
 jsonify({'prediction': int(prediction)})

    except Exception as e:
        retu
 jsonify({'error': str(e)}), 500
4. Running the Flask Application
To launch the server, run the following command in the terminal:
if __name__ == '__main__':
    app.run(debug=True)
How It Works
- The user sends a POST request to
/predictwith input data in JSON format. - The server processes the request, converts the input into a DataFrame, and feeds it into the trained ML model.
- The model predicts whether the user is at risk of heart disease and retu
s the result as JSON. - If an error occurs, the API responds with an error message.
Testing the API
To test the API locally, use a tool like Postman or send a request using Python:
import requests
url = 'http://127.0.0.1:5000/predict'
data = {
    "age": 55, "sex": 1, "cp": 2, "trestbps": 140, "chol": 230,
    "fbs": 0, "restecg": 1, "thalach": 150, "exang": 0,
    "oldpeak": 2.3, "slope": 2, "ca": 1, "thal": 3
}response = requests.post(url, json=data)
print(response.json())
This setup allows users to send user data to the API and receive a real-time heart disease prediction response. In my scenario, I used command prompt to send the requests with user’s synthetic data.
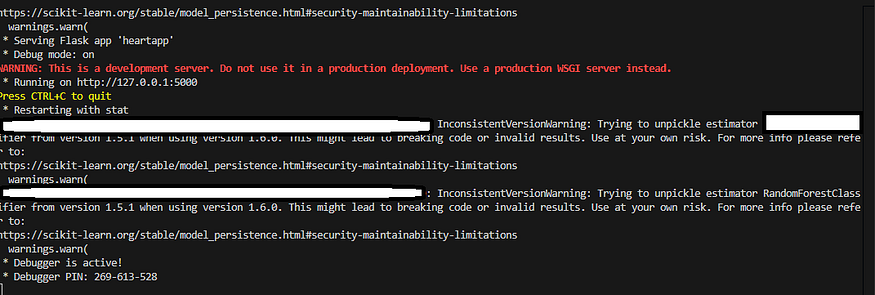
HeartApp Demo
Here the App deployed in flask is running and waiting for requests. I’m in the process of creating video demo which I will share later, to show case the process end to end.
Here is first prediction on a synthetic data

Here is another prediction on different user(synthetic data) where it predicted heart disease.

Key Takeaways
- AI as a Coding Assistant: AI-assisted coding tools significantly simplified the model development process, from writing initial code to debugging and optimization.
- Rapid Prototyping: What once seemed like a long, complex process became faster and more efficient, enabling me to focus on refining the model rather than struggling with code from scratch.
- Accessible ML Development: If you’re from a non-ML background (like I was), AI-assisted coding can make machine lea
ing far more approachable.
Conclusion
Building ML models doesn’t have to be intimidating. With AI-assisted tools, the barriers to entry are lower than ever. Whether you’re from cybersecurity, software development, or any other field, AI can help you step into the world of machine lea
ing with confidence.
In this post, we covered how I:
- Used AI to generate and optimize code.
- Built, evaluated, and deployed a machine lea
ing model for heart disease prediction. - Simplified the development process using AI tools like GitHub Copilot and code generators.
If you’ve ever been curious about building ML models but felt overwhelmed, I hope this example shows how accessible it can be. AI is not just transforming technology — it’s transforming the way we build it.
Finally, before ending this long post, I will mention that I will update this post regularly every time I’m doing further research or anything that might help the readers e.g. demo video is due.
Disclaimer: This research and experimentation and lea
ings I shared in this post are part of my research in my doctorate studies and are purely my thoughts not related to the organisation I work with.
About the Author

Principal Security Research Manager at Microsoft
Reference:
Singh, S (2025). From Cybersecurity to AI: How I Built ML based HeartApp Using AI-Assisted Coding. Available at: From Cybersecurity to AI: How I Built ML based HeartApp Using AI-Assisted Coding | by Suraj Singh | Mar, 2025 | Medium [Accessed: 16th March 2025].


